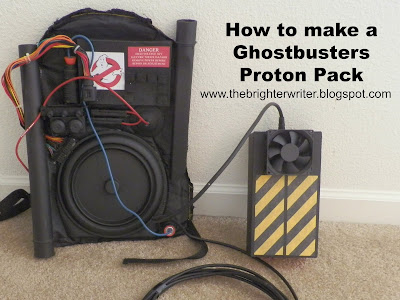
Ok, so I was basically meant to be a Ghostbuster at some point in time for Halloween. This year turned out to be the year. I didn't have any problem picking up the outfit at a second hand store, but the proton pack that I found to go with it was a blow up super cheesy kind that I had no interest in. So I decided to make my own.
Here's how you can make one too.
Step 1: Find yourself a backpack. Any kind with black straps will do. I got this Disney Cruise Line pack at Good Will for $1.99
Step 2: Get a stitch ripper and take off the entire front of the back. All you need is the flat black base and the straps. Everything else can go.
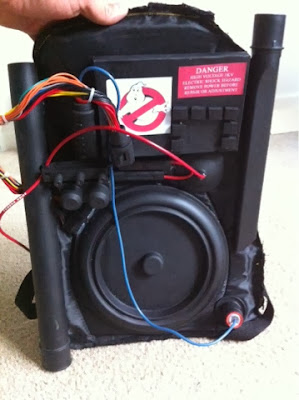
Step 3: Find a bunch of crap around your house that you don't mind destroying. It really can be anything you want. You're going to end up painting it so make sure it isn't anything you'll want to use again in the future. I used a breakfast sausage box, an old handle from my daughter's plastic sand shovel, a large plastic Lego, a Tupperware lid, the plug bottom of a burned out night light, a cable splitter, a metal hook and a handful of random vacuum attachments.
Honestly, a pile of trash.
Step 4: Take your trash, spray paint it all black and hot glue gun everything to the back pack. Make sure you lay it all out first and have all the pieces where you want them to go.
Here's what the original looks like in case you need a point of reference:
As you can see from above, you need wires. You'll need to grab some sort of used electronic for step 5. Again, I hit up the Good Will and found an old speaker box from a computer and the guy sold it to me for a dollar.
Take apart the box, be careful not to cut yourself, and pull out all the old wires that look proton-packish. Go for the ones with lots of colors.
Grab your hot glue gun and glue your wires wherever they fit. Sorry to be so vague, but your pile of trash is going to be different than mine, so just use your best judgement here.
I used sticky label paper from OfficeMax to print out some stickers from the internet.
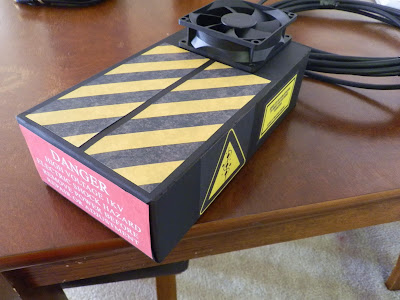
For my ghost trapper, I used an old Kleenex box.
Step 1: paint it black.
Step 2: Put your stickers on. ( I found a black fan inside the previously pulled apart speaker box and glued that on for good measure.)
My cord is just an old coaxial cable. Feel free to add a handle or whatever else to it. I wasn't going to make another trip to the Good Will so I just called it a day on this one.
Happy Ghost Busting!
Want to hear more from me? Follow me on Instagram! @thebrighterwriter


Thank you SO much!! It just so happens I am in the process of making Ghostbusters costumes for my 5 year old and myself, and have been going back and forth in my head how to make proton packs. This really helped me - thank you!
ReplyDeleteI too thank you very much. My daughter is gonna be a ghostbuster for halloween and this really helped me get an idea of how to make the pack cheap but still looks good. We both had the same ideas so it was nice to see a finished product before I started on mine. Thanks again!!
ReplyDeletethis is great! Making one now. Any suggestions for making the stripes on the ghost trapper? They are not included in the stickers. Thanks!
ReplyDeleteI used a pencil and a ruler to draw my lines. The good thing is that if they are uneven they don't really show up or you can paint over them again.
DeleteThis is awesome! Thank you for the ideas! Do you happen to have printables for the ghost trapper?
ReplyDeleteThis is just cool as all hell! A fine alternative to all the guys out there whose idea of making a "cheap" prop involves a few hundred dollars. Good form!
ReplyDeleteThis is "The Year" for me too, your post was very helpful! Thank you!
ReplyDeleteYou are absolutely AWESOME! So appreciated. I have 2 nephews who are really into the Ghostbusters and I can't find anything like I bought for my son back in 1990. They are so cheaply made and very expensive at the same time! Going to make two myself. I actually had most of the stuff right here, including a glue gun! Thank you!
ReplyDeleteCan you upload or send me a copy of the stickers you printed out? stephlauren16@gmail.com
ReplyDeleteAwesome! Thank You!
ReplyDeletethanks for the tips!!!!!
ReplyDeleteI'm inspired. The movie was to awesome to not be a Ghostbuster this year! Thanks for the great tutorial and inspiration!
ReplyDeleteWe used your ideas and it turned out great-thanks!
ReplyDeleteHi! I wanted to say I used your steps as a guide to make 2 Proton Packs for my boys who are 5 and 2. They were a hit! We only spent a dollar for a little bit of rope instead of tubing. With a few stickers, they looked great!
ReplyDeleteThanks! This is a great tutorial/guide for a non crafty person who has a 5 yr old ghostbuster fan in the house. I always felt intimidated to try making one.
ReplyDelete